


Login to ShipSaving. Go to Stores, and choose TikTok Shop.
Now Customize your store information, and then click Add Store.

ShipSaving will then take you to TikTok Authorization Process Page.
If you are Local seller please choose North America seller, if you are Cross-border seller please choose Asia seller , then click Next.

Then, please check the box and click Confirm to Install.

Now, Click Authorize!
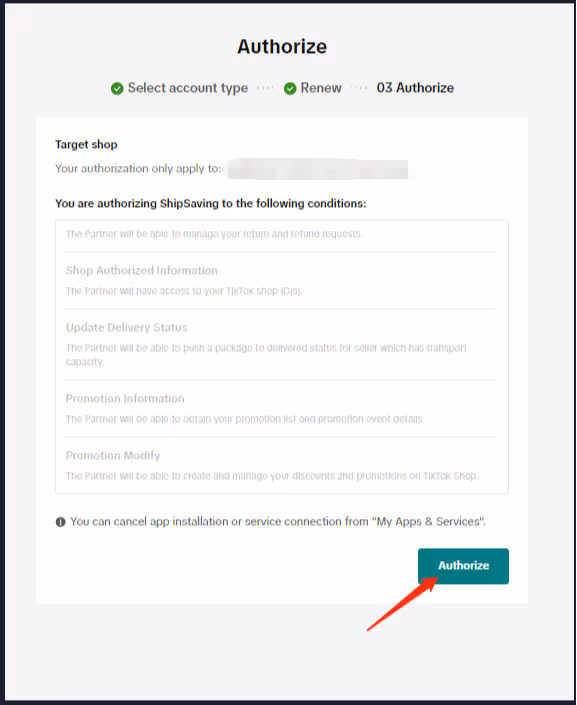
Congrats! It's done.
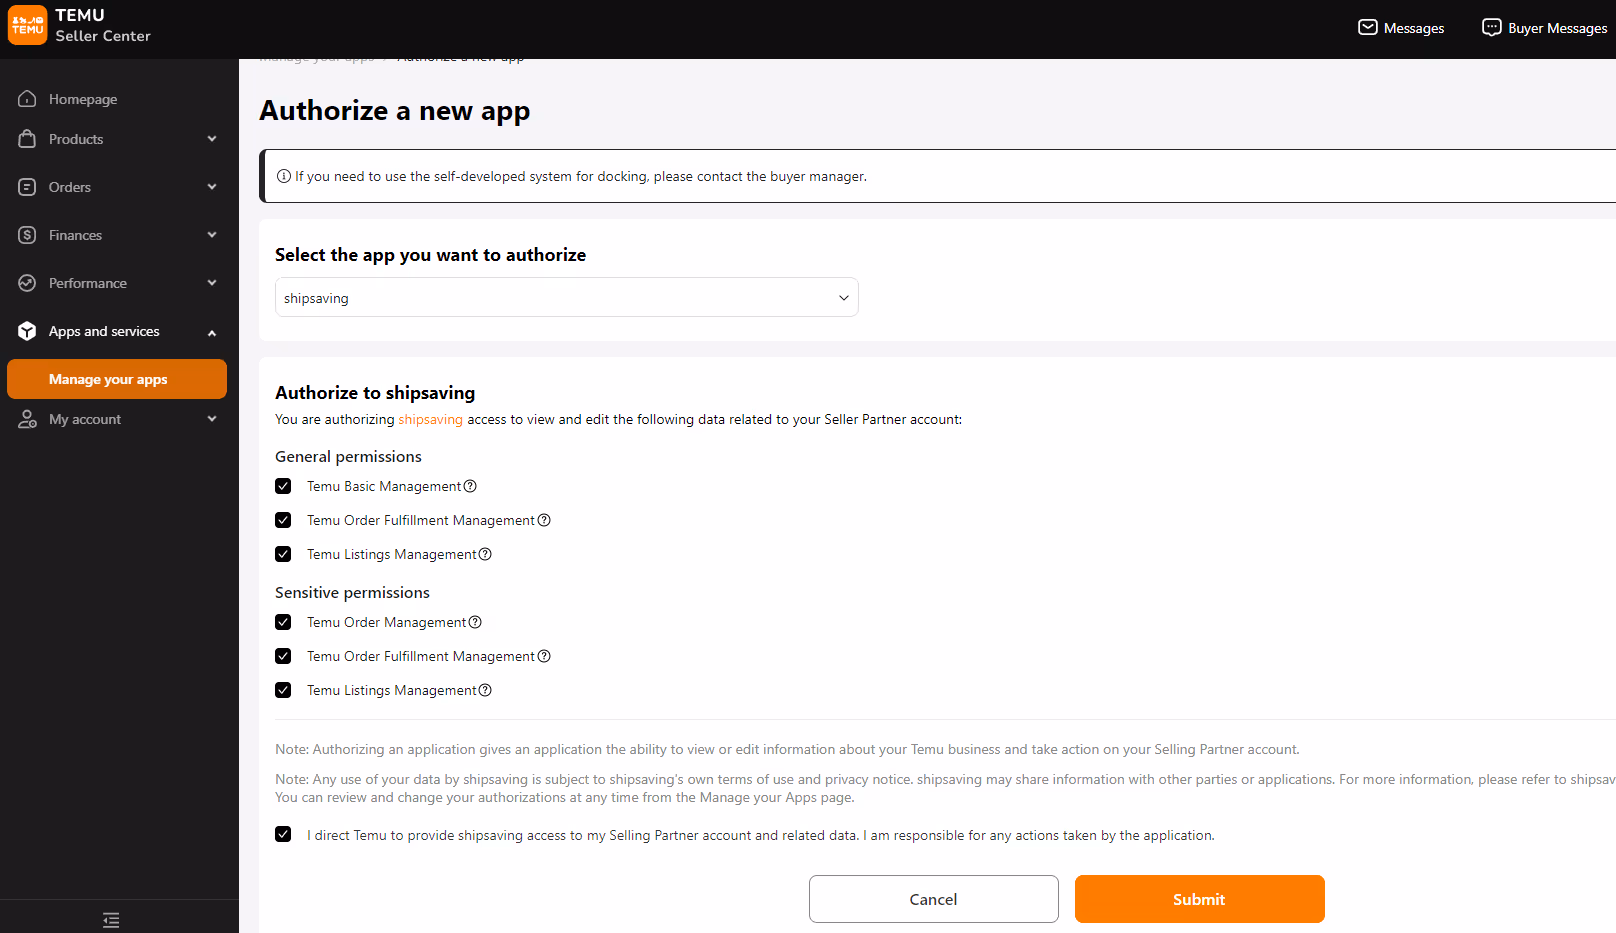
Go to your Temu Seller Center. Please click Apps and services -> Manage your Apps. Select ShipSaving as the app to authorize.
Make sure to check all permission boxes to ensure order syncing. Then, Temu will generate an Access Token for you after click Submit.
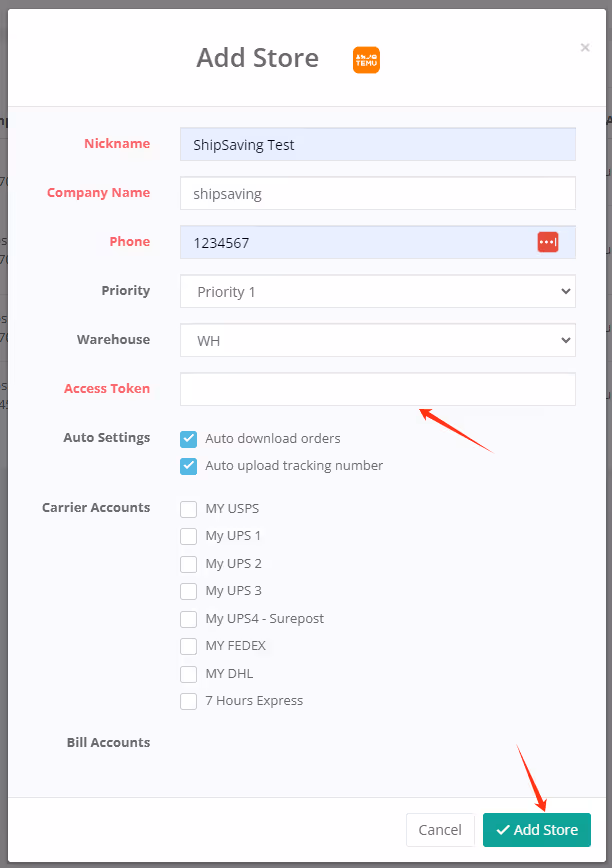
Login to ShipSaving. Go to Stores, and choose Temu.
Now Customize your store information and paste the token into the Access Token field, then click Add Store.
Go to your Temu Seller Central. Please click System Management -> Authorization Management and then click Add Authorization.
Select ShipSaving and choose all the boxes under Special Authorization. Temu will generate an access_token for you after click Confirm.

Login to ShipSaving. Go to Stores, and choose Temu.
Now Customize your store information and paste the token into the Access Token field, then click Add Store.
Congrats! It's done.
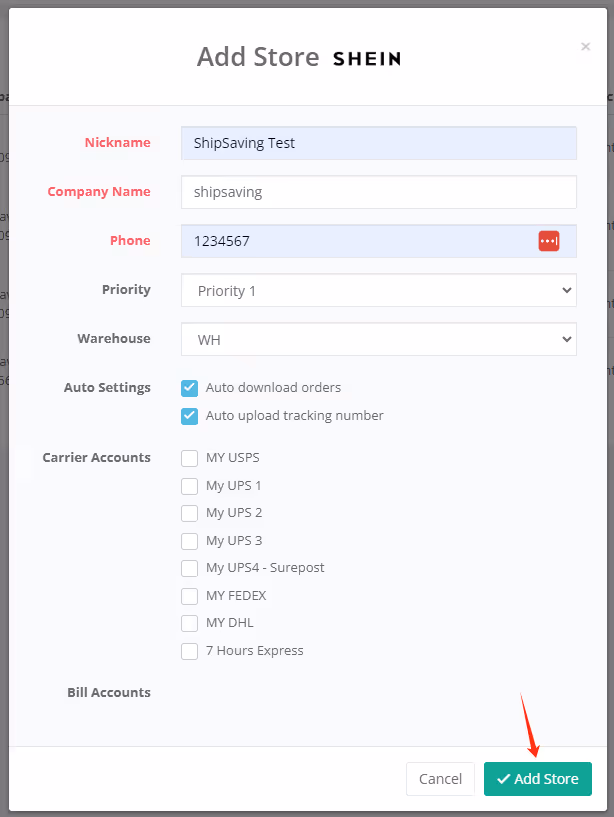
Login to ShipSaving. Go to Stores, and choose SHEIN.
Fill in the information, Auto Settings and set up Carrier Accounts. Click Add Store.
ShipSaving will then take you to the SHEIN login page. Log into your account.
Click Confirm Authorization to allow access.

Congrats! It's done.
Login to ShipSaving. Go to Stores, and choose Amazon.
Enter the nickname of your Amazon store, and then click Add Store.

ShipSaving will then take you to the Amazon login page. Log into your account.
Please check the box and click Login to ShipSaving now.

Congrats! It's done.
Login to ShipSaving. Go to Integration Store, click Connect Your Store and choose AllValue.

Please select the store you need to integrate. Then click Apps and choose ShipSaving Starter.
Login to ShipSaving. Go to Stores, and choose AllValue.
Enter the nickname of your AllValue store, and then click Add Store.
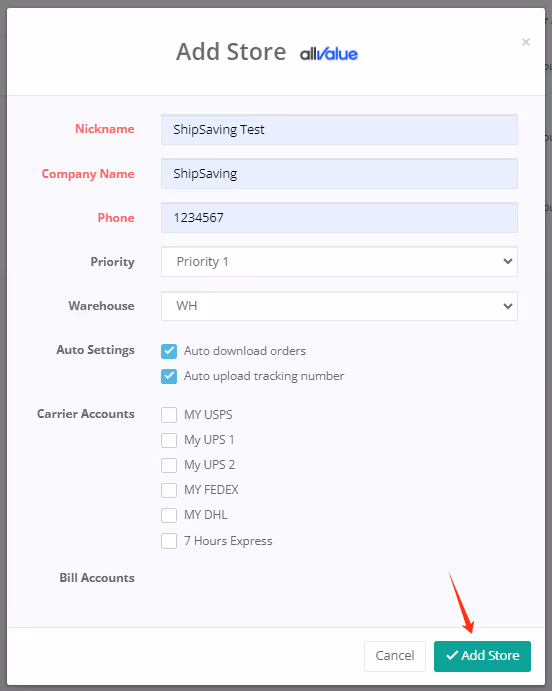
Please select the store you need to integrate. Then click Apps and choose ShipSaving Pro.

Congrats! It's done.
Login to ShipSaving. Go to Stores, and choose eBay.
Fill in the information, Auto Settings and set up Carrier Accounts. Click Add Store.

ShipSaving will then take you to the eBay login page. Log into your account.
Click Agree to allow access.
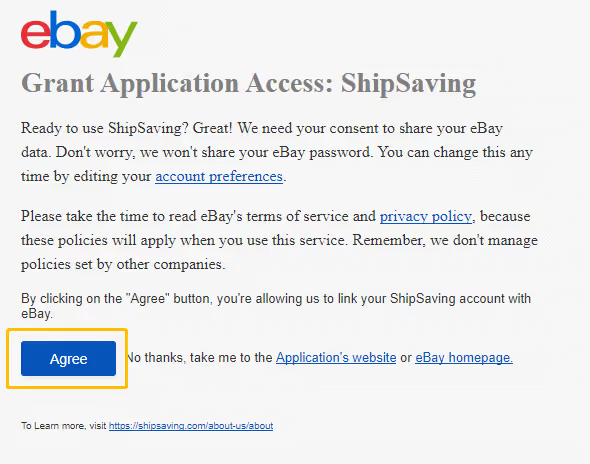
Congrats! It's done.
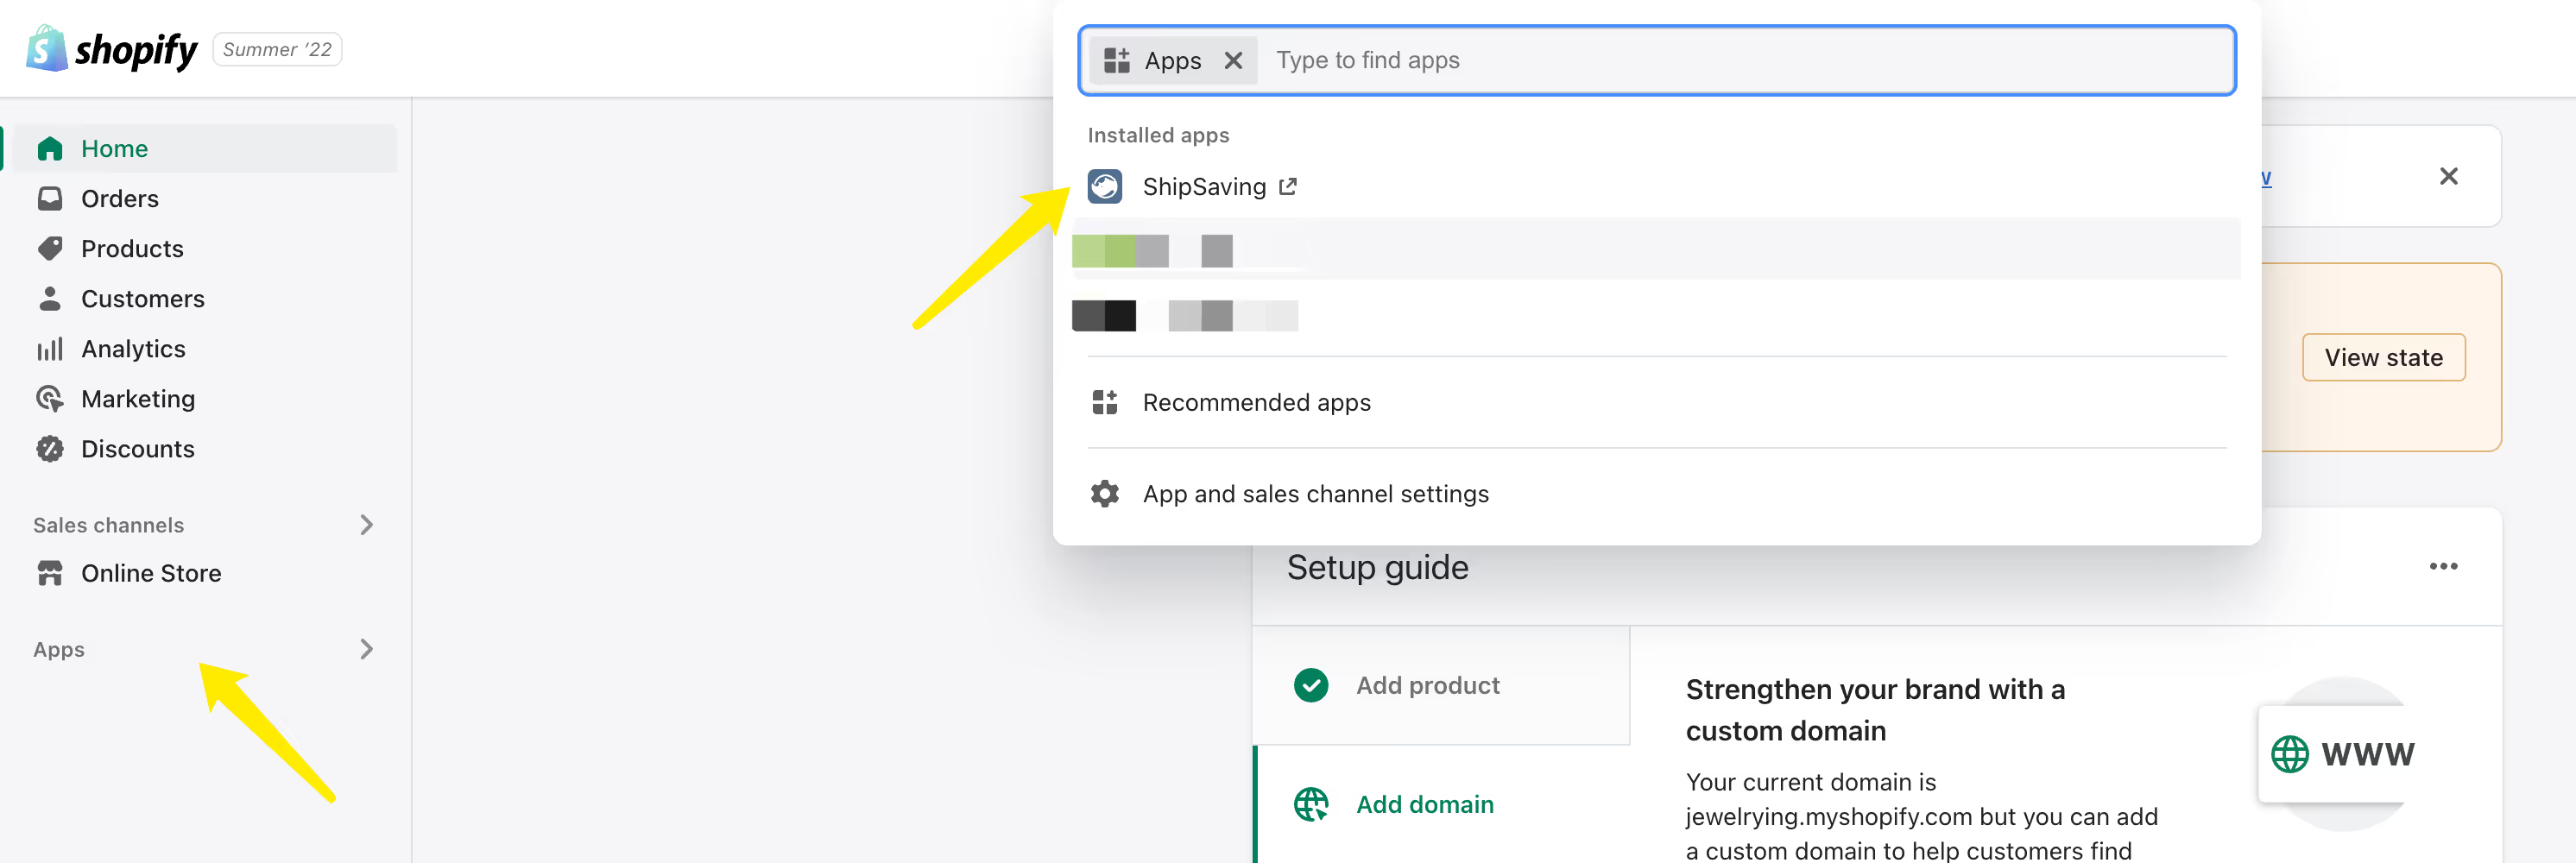
Login to ShipSaving. Go to Stores, and choose Shopify.

After you click the Shopify logo, you will be direct to the Shopify App Store. Click Add app

If you are not login to Shopify yet, please login first.
After you login, go to Apps and choose ShipSaving in the dropdown menu.
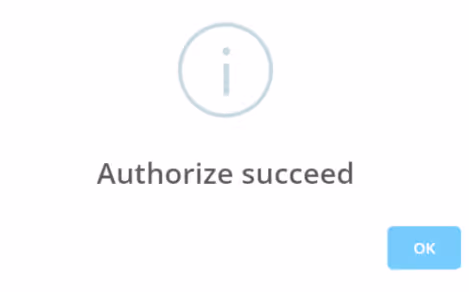
Then you will be direct back to ShipSaving stores page, shows "Authorize succeed".
Congrats! It's done.
Login to ShipSaving. Go to Stores, and choose Etsy.
Fill in the information, Auto Settings and set up Carrier Accounts. Click Add Store.

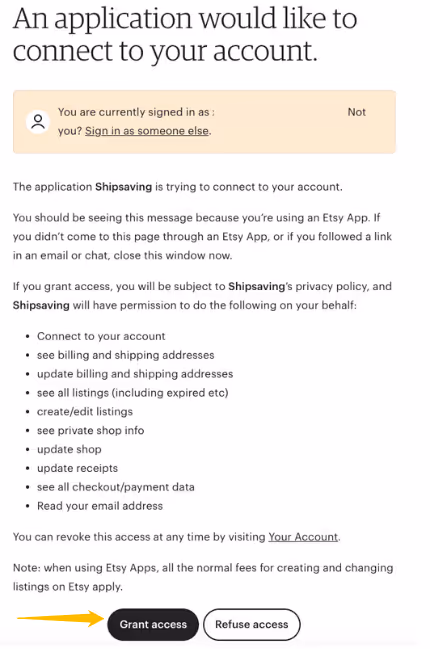
ShipSaving will then take you to the Etsy login page, log into your account and click Grant Access. If successful, a message of Authorize Succeed will appear.
Congrats! It's done.
Login to ShipSaving. Go to Stores, and choose Ecwid.
Fill in the information, click Add Store.

ShipSaving will then take you to the Ecwid login page, please log into your Ecwid account.

Congrats! It's done.
Log in to your WooCommerce store. Go to Setting -> Advanced -> REST API, and click Add Key

Fill in the box, choose Permissions to Read/Write, and click Generate API Key

Then, copy the Consumer key and Consumer secret

Please download and install the Advanced Shipment Tracking plugin to upload your tracking to WooCommerce.

Login to ShipSaving. Go to Stores, and choose WooCommerce.
Fill in all the required info, and copy-paste your Key & Secret, then click Add Store.

Congrats! It's done.
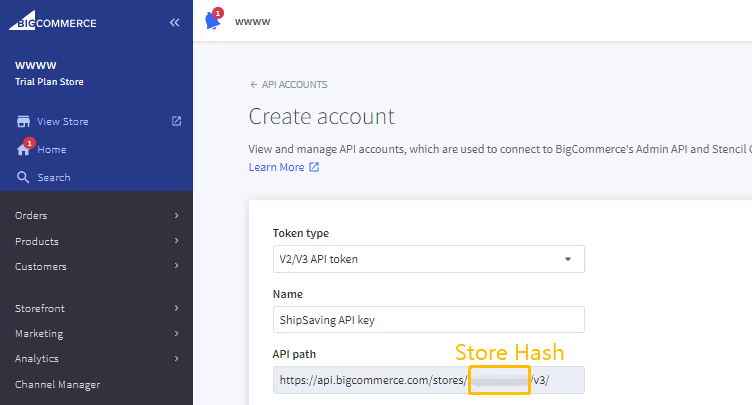
Login to your BigCommerce account. Click Settings on the left side menu, then click API accounts.

Under Create account, choose V2V3 API token for Token type.
Create a name for the new API Account, (ex. ShipSaving API Key).
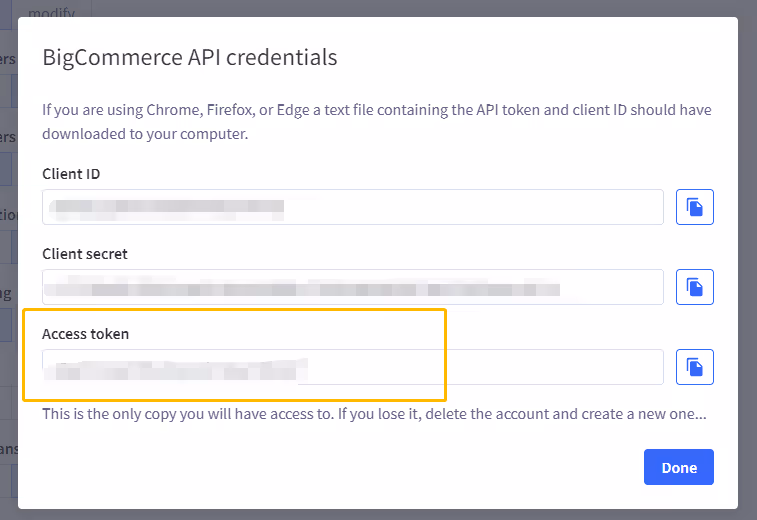
Your store hash key is displayed as part of the API Path link.
Copy and paste to the ShipSaving dashboard.
Under OAuth Scopes section, change settings to:


Your API Credentials (Access Token) will be displayed, take a note or screenshot. This will be the only time to access this information.
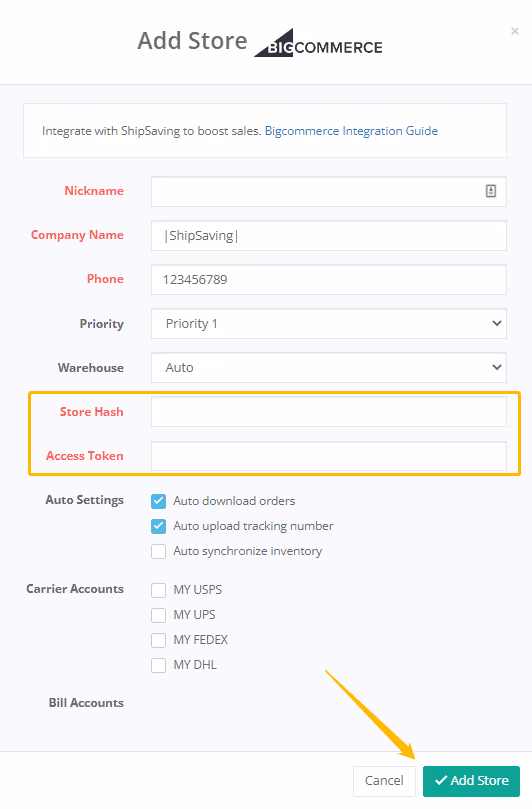
Login to ShipSaving. Go to Stores, and choose BigCommerce.
Fill in your Store Hash, Access Token. Finish Auto Settings and setting up Carrier Accounts. Then click Add Store.
Congrats! It's done.
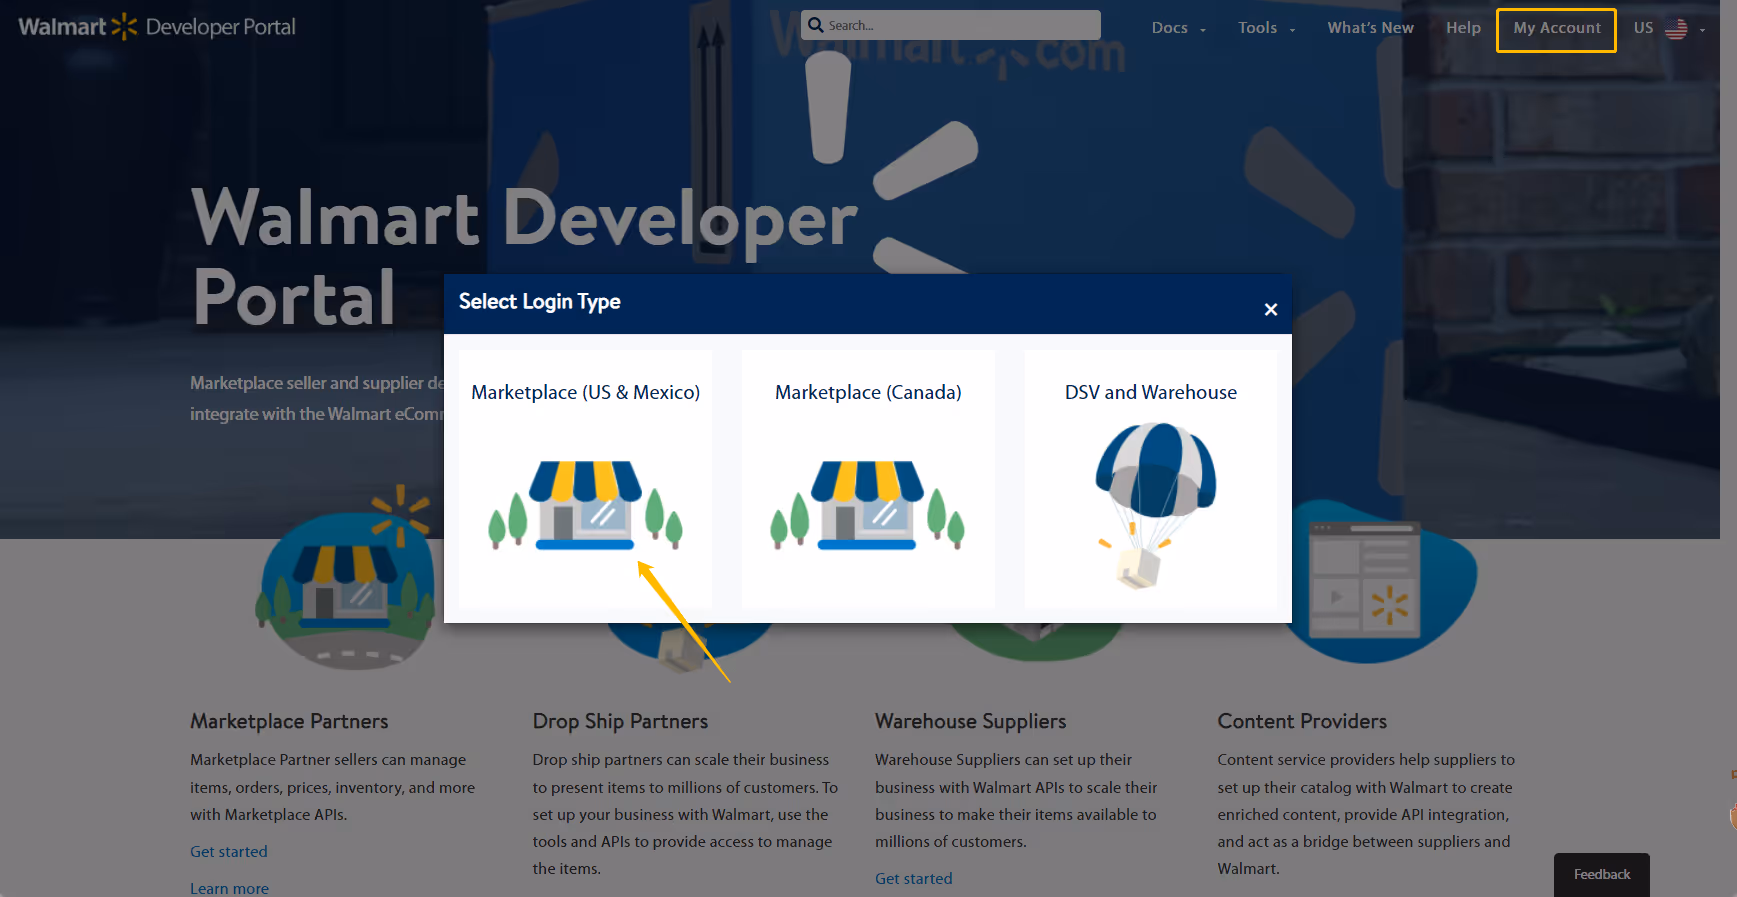
Login to your Walmart Developer Portal.
Click My Account on the upper right corner, and select Marketplace
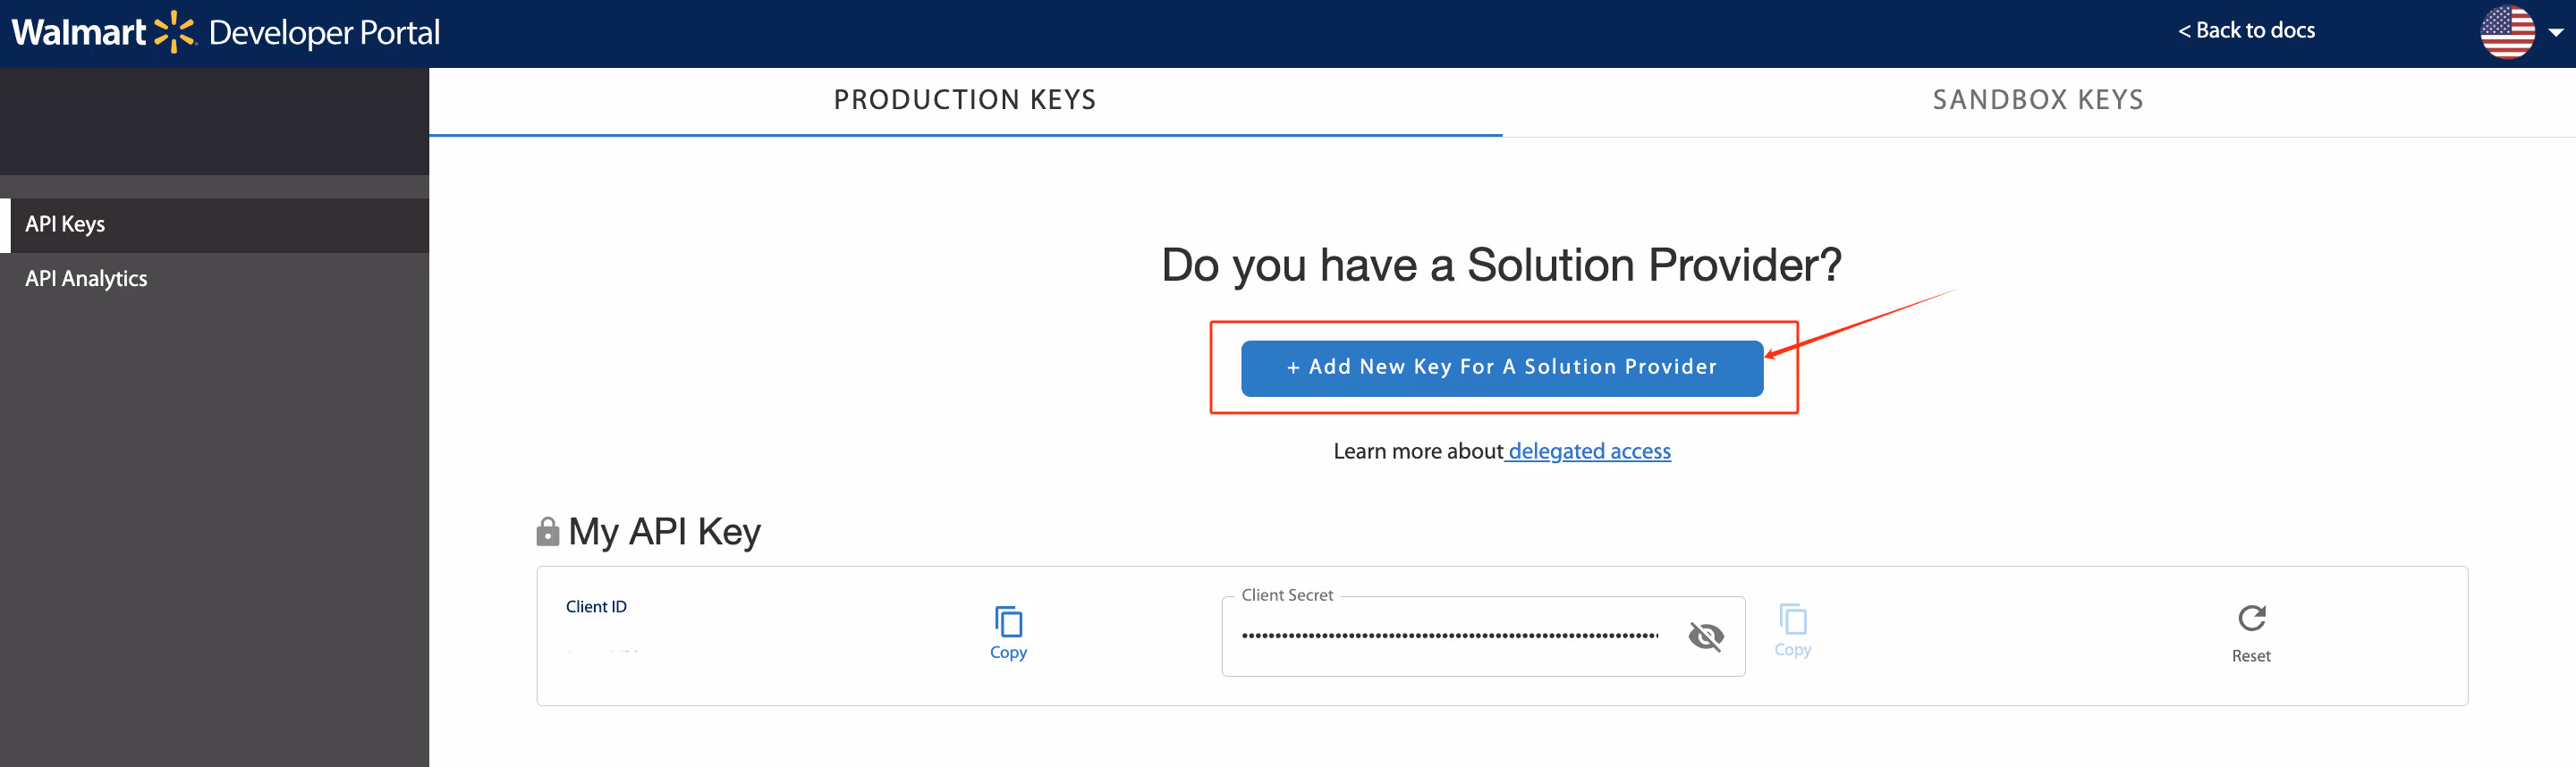
Click API Keys -> Production.
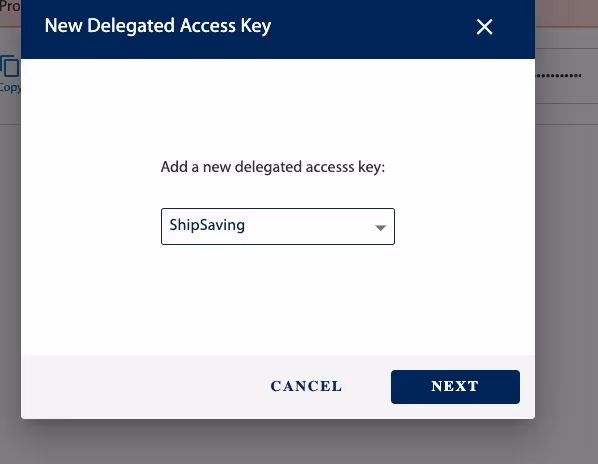
Then, please click + Add New Key For A Solution Provider. Choose ShipSaving as the new delegated, click Next.
Please check Full Access in all Key Permission options, click Submit.

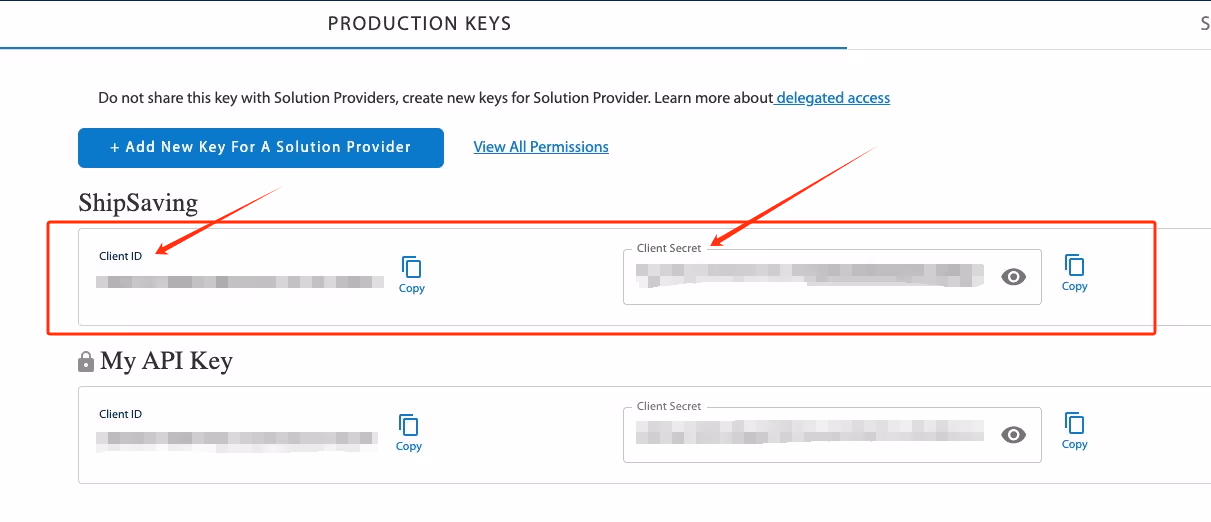
Copy your Client ID and Client Secret (If blank, click “Reset”)
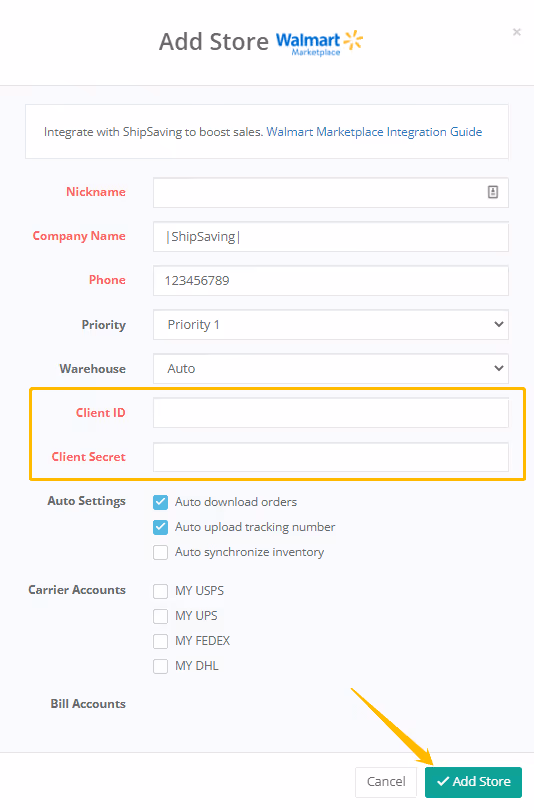
Login to ShipSaving. Go to Stores, and choose Walmart Marketplace.
Fill in your company name, phone number, and paste your Client ID and Client Secret. Click Add Store button.
Congrats! It's done.
Login to your Walmart Developer Portal.
Click My Account on the upper right corner, and select DSV and Warehouse

Click Settings on the upper right corner, and click API Credentials
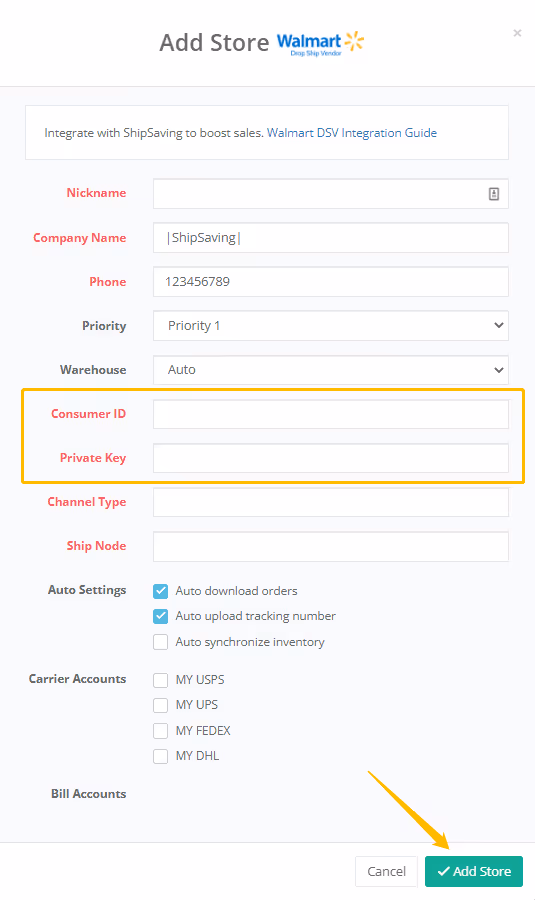
Login to ShipSaving. Go to Stores, and choose Walmart DSV.
Fill in your company name, phone number, and paste your Consumer ID and Private Key. Click Add Store button.
Congrats! It's done.
Login to ShipSaving. Go to Stores, and choose Wish.
Fill in your company name, phone number, and other information required. Finish Auto Setting and setting up Carrier Accounts. Then click Add Store

ShipSaving will then take you to the Wish login page, sign in to your account. If successful, a message of Authorize Succeed will appear.
Congrats! It's done.
Login to ShipSaving. Go to Stores, and choose Wix.
Fill in your company name, phone number, and other information required. Finish Auto Setting and setting up Carrier Accounts. Then click Add Store

ShipSaving will then take you to the Wix Store Page. Please Select the store and then click Agree & Add. If successful, a message of Authorize Succeed will appear.

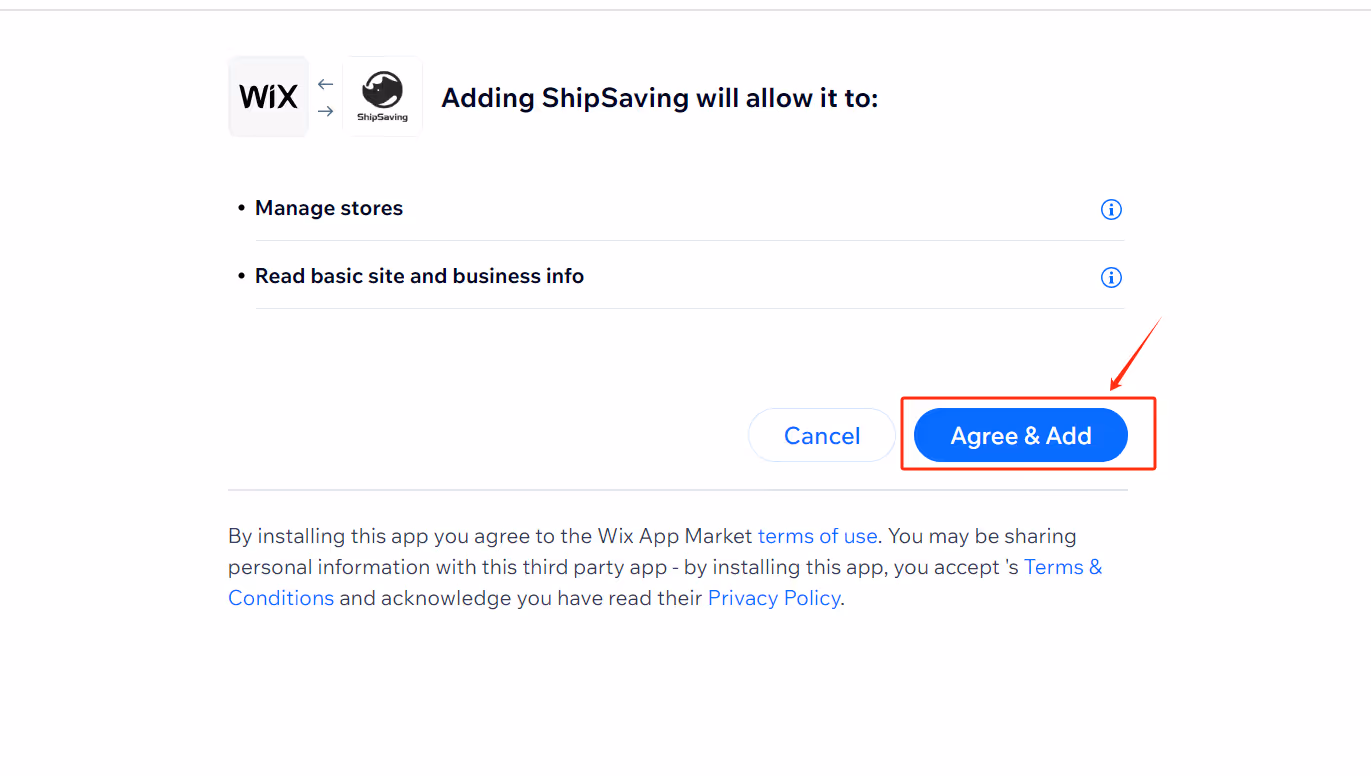
Congrats! It's done.
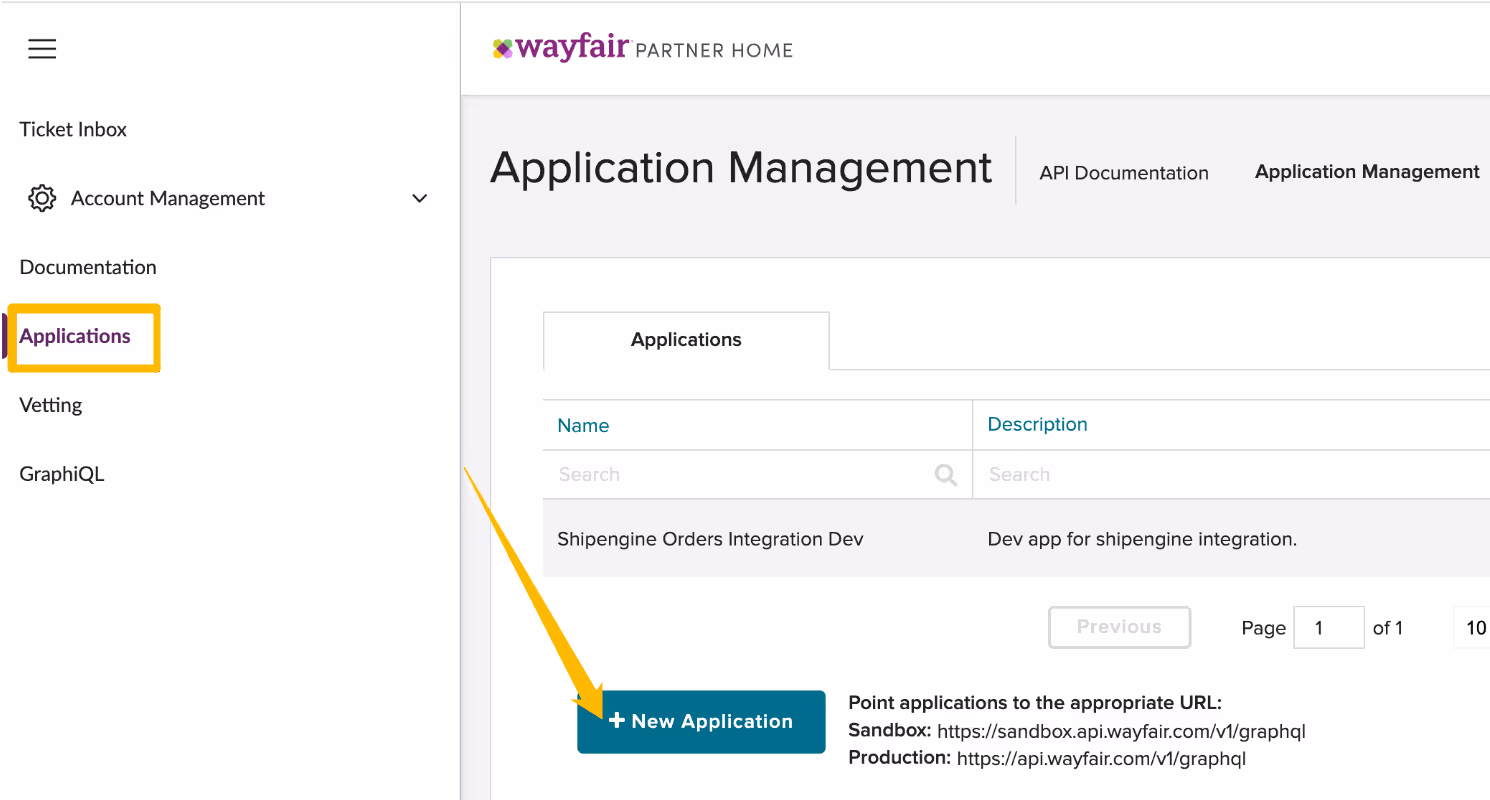
Login to your Wayfair account portal.
Select Applications tab, then click + New Application
After you click this button you’ll see a Create Application popup. Enter the name and description for the new application. The name and description can be anything you want. For example name ShipSaving you can easily figure out the purpose of this application.
Toggle the selection from Sandbox over to Production. And the click Save button. This will open the Client Secret popup window.

Copy your Client ID and Client Secret from popup window to ShipSaving Store.

Login to ShipSaving. Go to Stores, and choose W.
Copy-paste your Client ID & Client Secret to ShipSaving. Check Auto orders & Auto upload tracking numbers, then click Add Store.

Congrats! It's done.
Login to your ShipSaving account, click Integration -> Quickbooks, and click the button to sign in to your Quickbooks account.

And when the authorize succeed, you will be direct back to ShipSaving.

Go to your Order page, select the orders, click More - Sync Quickbooks - Quickbooks. , and then click Sync.
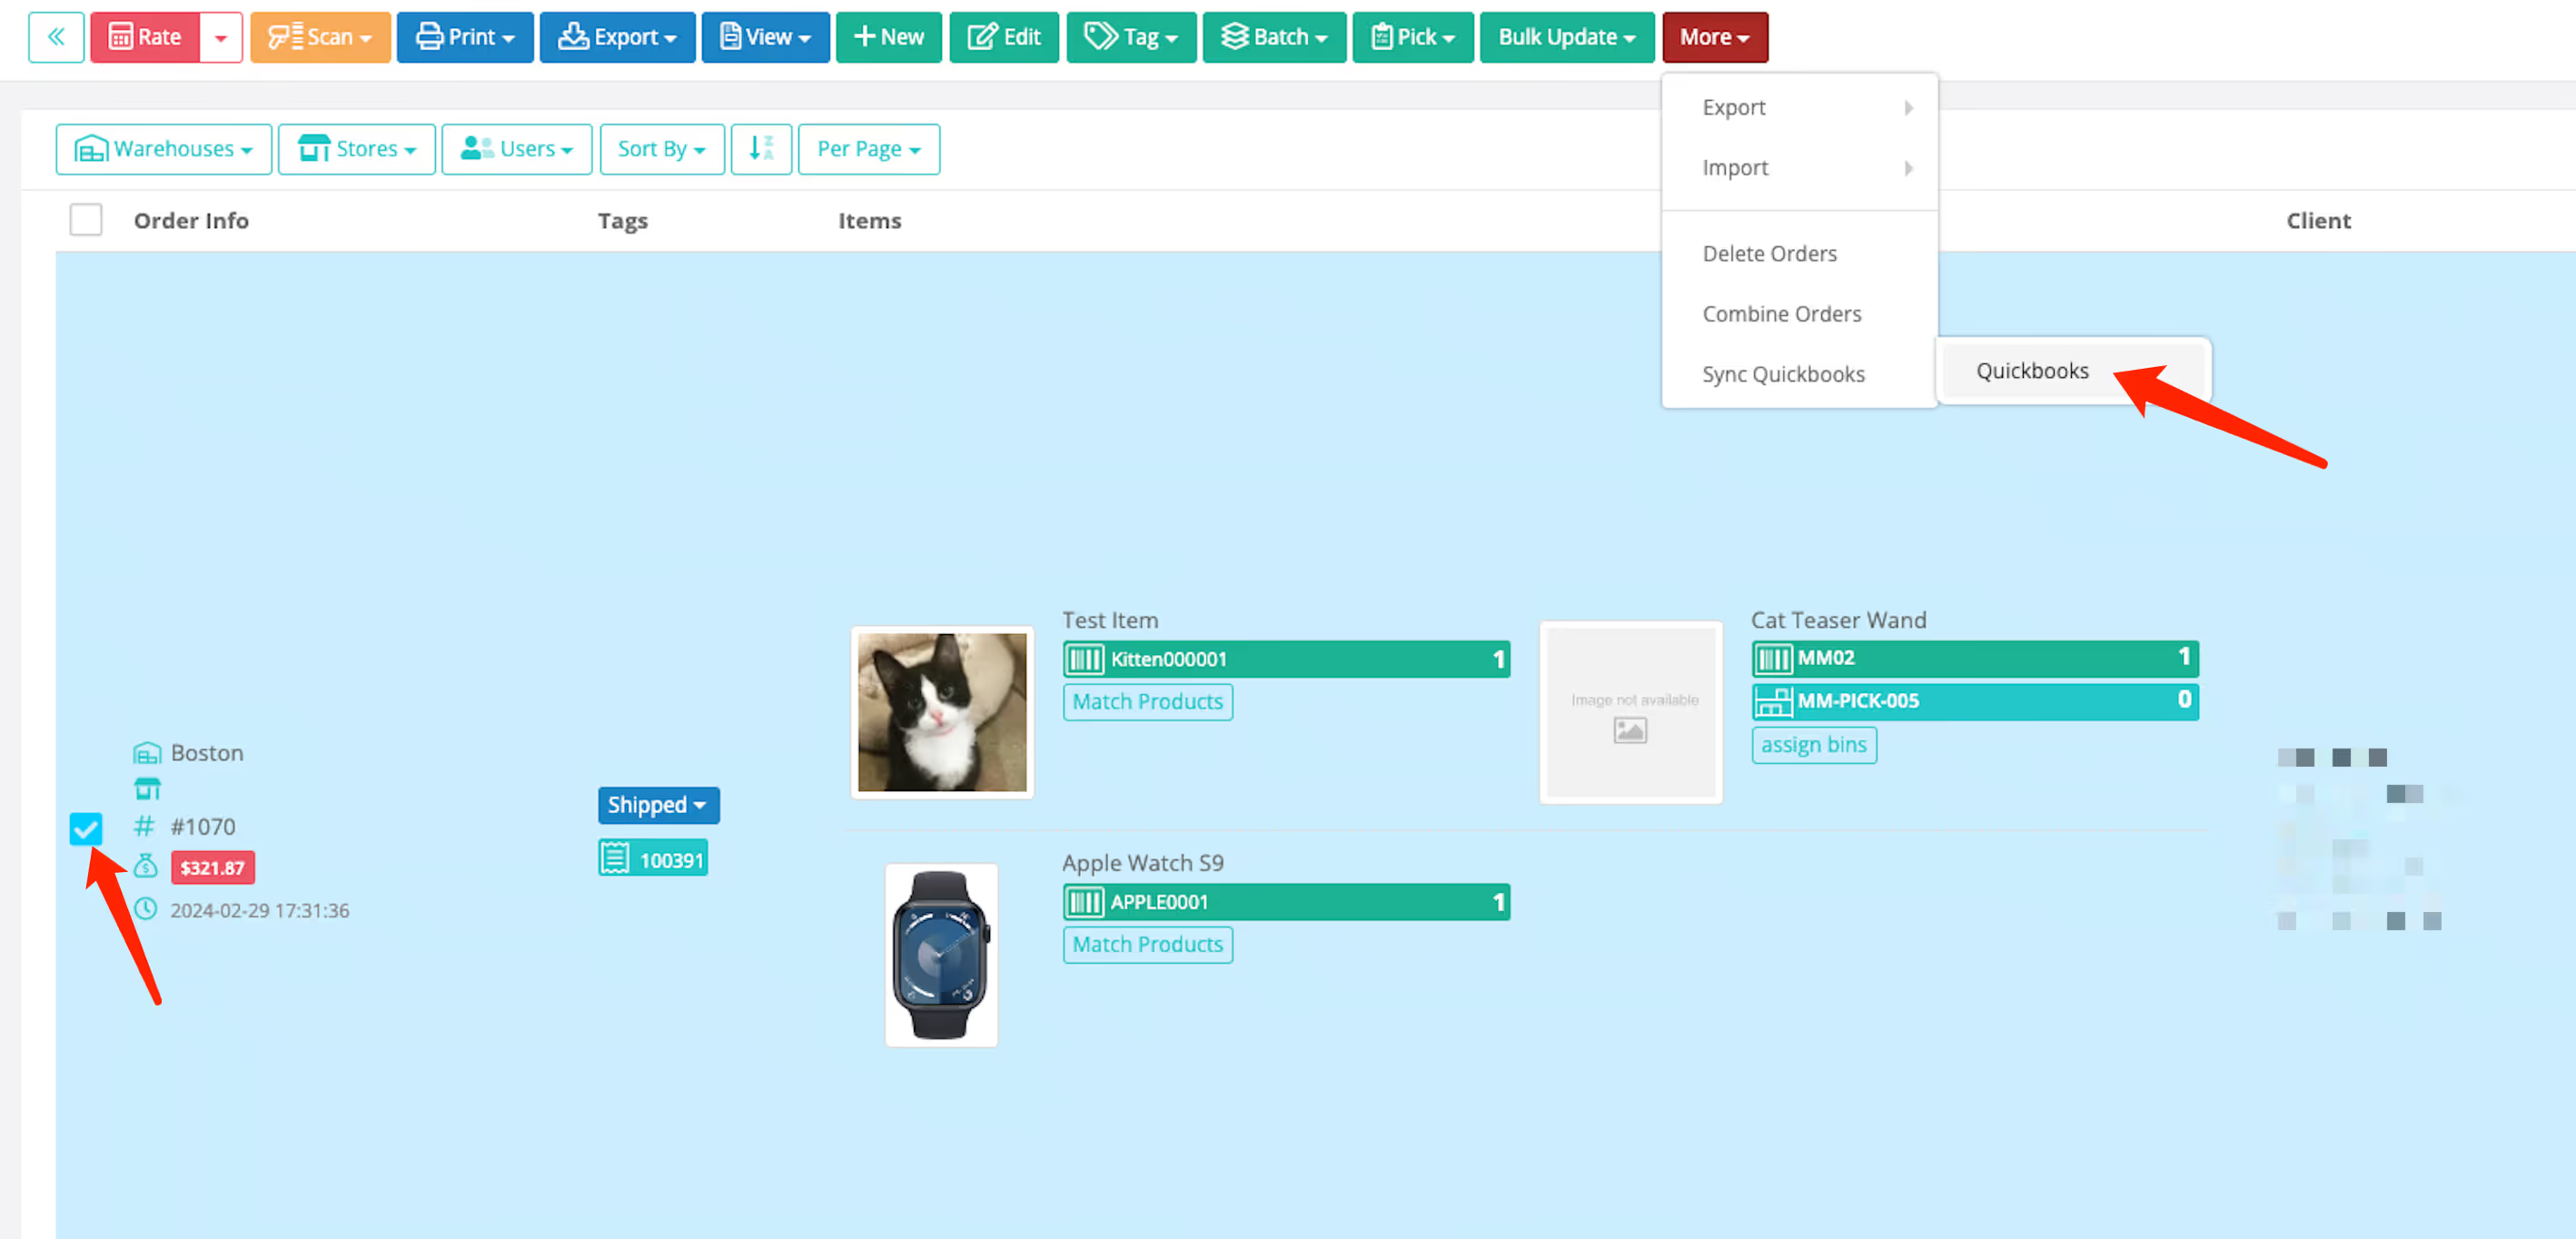

Congrats! It's done.
Login to your ShipStation account, click Setting -> Account -> API Settings -> Generate API Keys
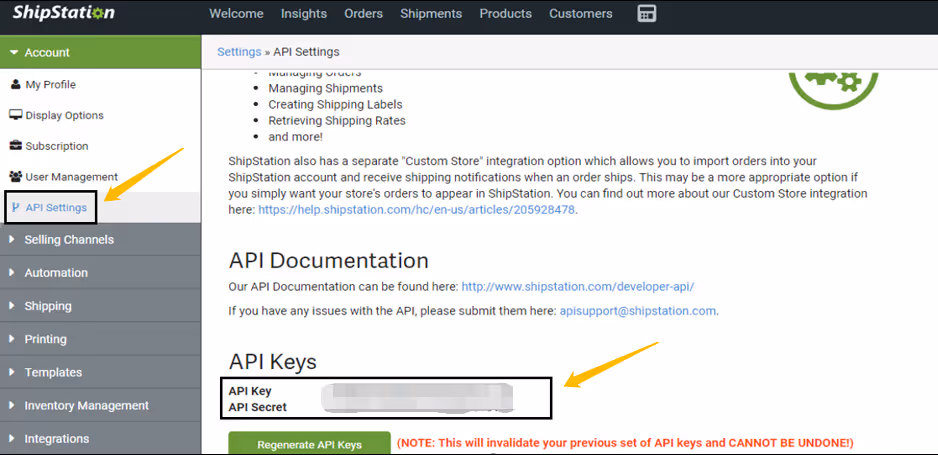
Login to ShipSaving. Go to Stores, and choose ShipStation.
Copy-paste your API Key & API Secret to ShipSaving. Check Auto orders & Auto upload tracking numbers, then click Add Store.

Congrats! It's done.
Login to Magento Admin Panel. Go to System under Web Services and click SOAP/XML-RPC - Roles.

Click Add New Role on the upper right corner.

Create a Role Name (ex. ShipSaving), and enter your current admin password. Click Save Role on the upper right corner.

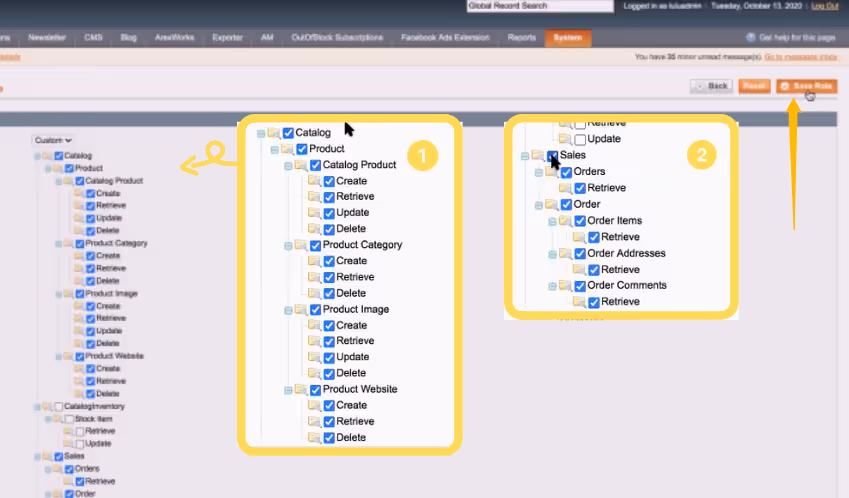
Check the boxes for Catalog and Sales
Click Save Role on the upper right corner.
You have succesfully create a role, then create a user for that role.
To create new users, go to System under Web Services, click SOAP/XML-RPC - Users.

Create a new user with a custom API Key (please take a note of the key) and click Save User

Under User Role, select the user you just created and click Save User
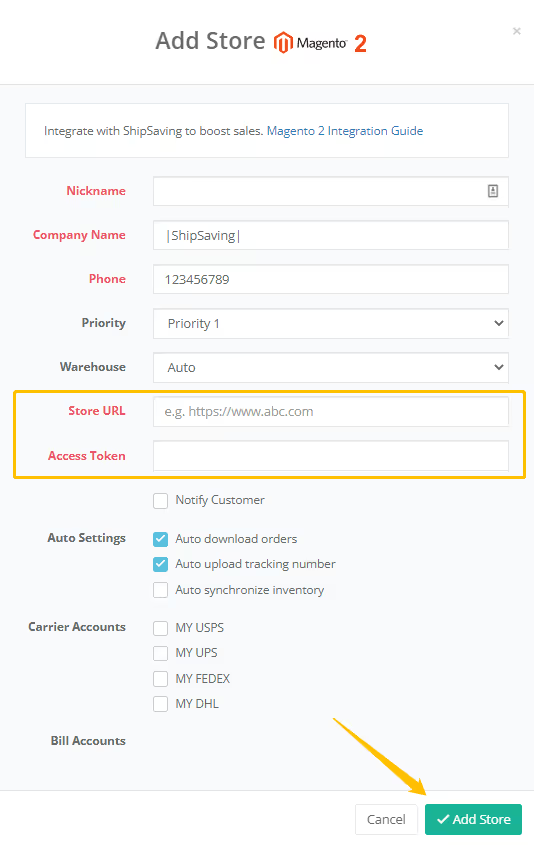
Login to ShipSaving. Go to Stores, and choose Magento.
Fill in your company name, phone number, store URL, user name, and the API Key. Finish Auto Settings and setting up Carrier Accounts. Click Add Store

Congrats! It's done.
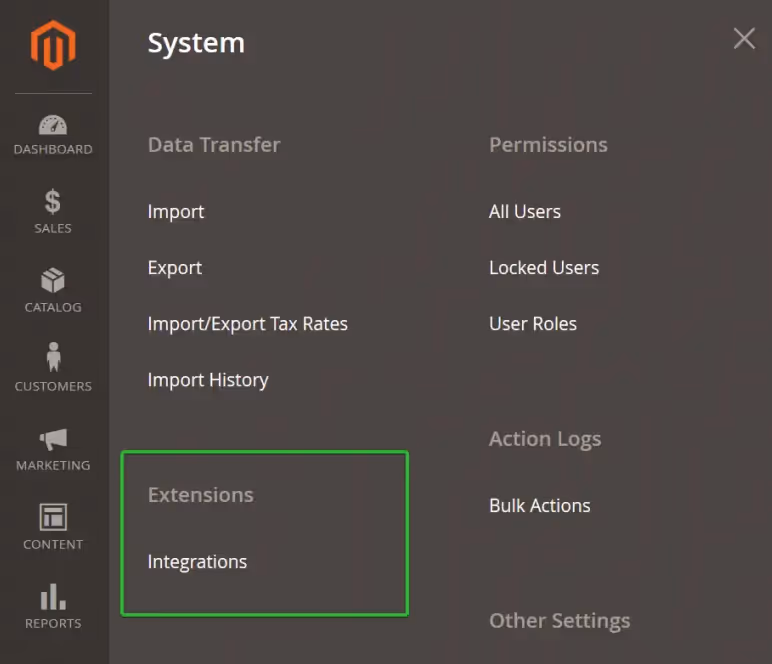
Sign in to your Magento account. Go to System on the left side navigation bar, and click Integrations.
Click Add New Integration on the upper right corner.

Enter store name and password. Click Save on the upper right corner.

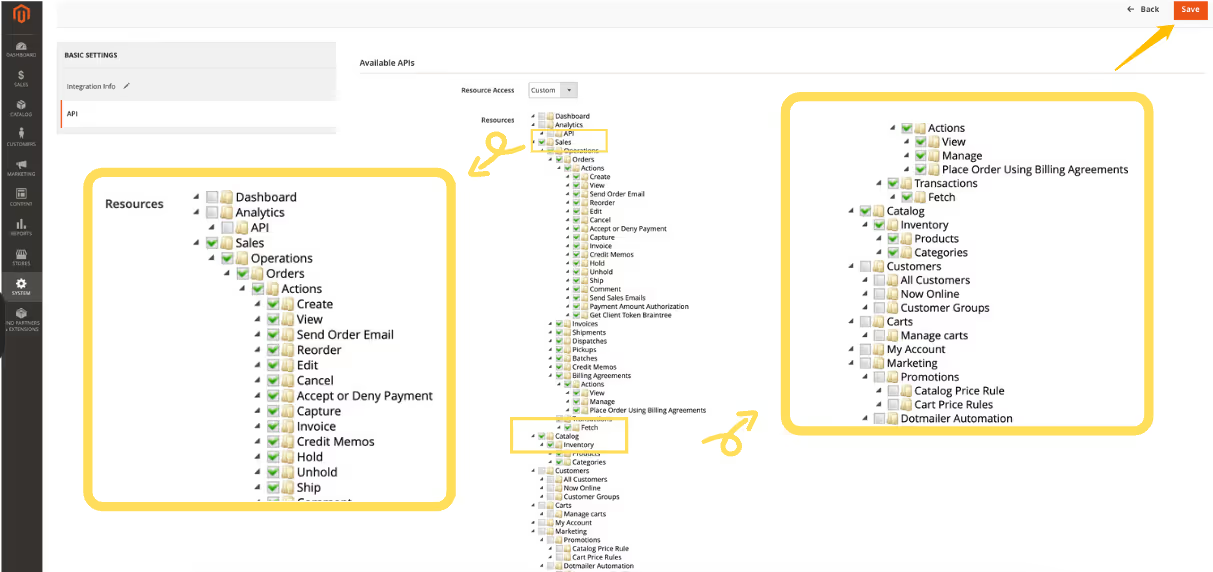
Click API under Basic Settings on the left. Check the boxes for Sales and Catalog, and click Save on the upper right corner.
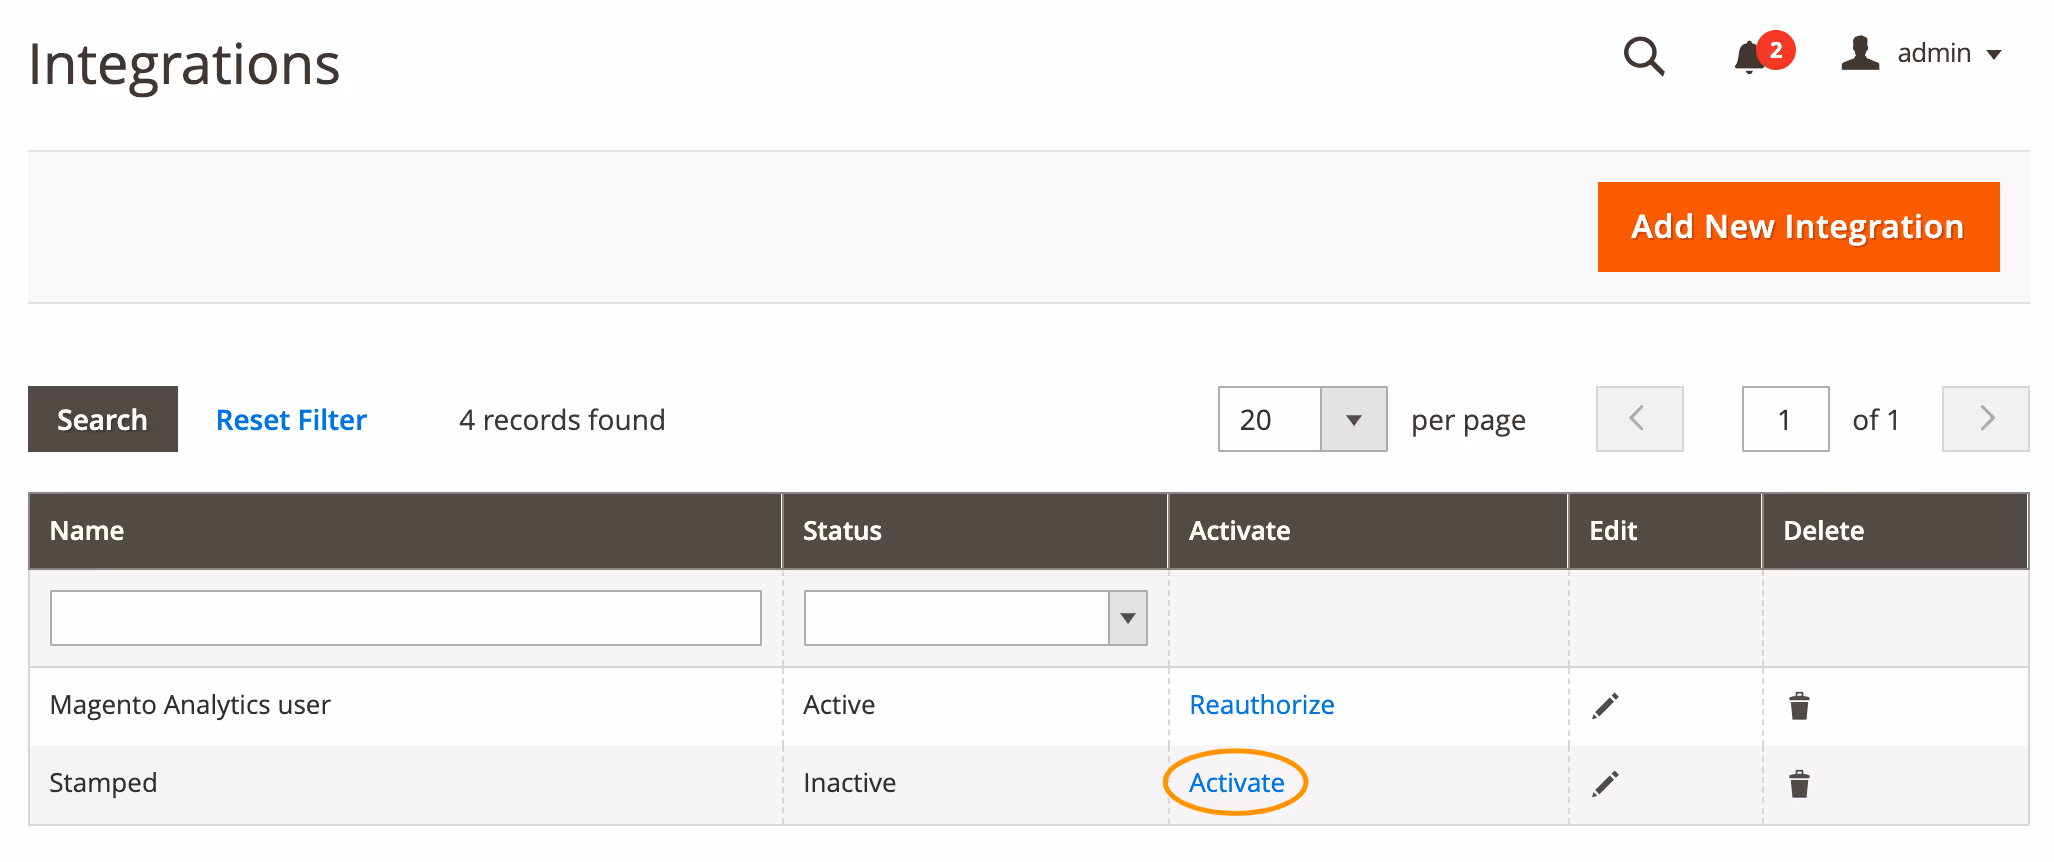
Then, return to Integrations and click Activate.
A confirmation page will then pop out, click Allow.
Copy Access Token, and click Done.

Login to ShipSaving. Go to Stores, and choose Magento 2.
Fill in your store info and paste Access Token, finish Auto Settings and carrier accounts. Click Add Store.
Congrats! It's done.
To get your API Key, go to SquareSpace, click Settings in the home menu. Click Developer API Keys and Generate Key.

1. Enter a Key Name.
2. Select the permissions for the API key.
3. Under Permissions, check Orders, Forms, Inventory, or Transactions. Select Read Only for all options. Then click Generate Key.

(Forms are available in the Business plan or higher. Orders, Inventory, and Transactions are only available in the Commerce Advanced plan.)
Your API key is generates, click COPY KEY.

Login to ShipSaving. Go to Stores, and choose Squarspace.
Fill in your company name and phone number. Paste the API Key to ShipSaving dashboard, finish Auto Settings and Carrier Accounts. Click Add Store

Congrats! It's done.
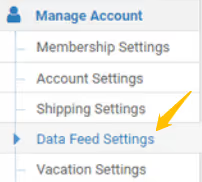
Log in to your Newegg Marketplace Seller Portal. Go to Manage Account -> Data Feed Settings.
Click Authorize, click Select Your Provider dropdown menu and choose Generate API key, and then copy your Seller ID and Secret Key.

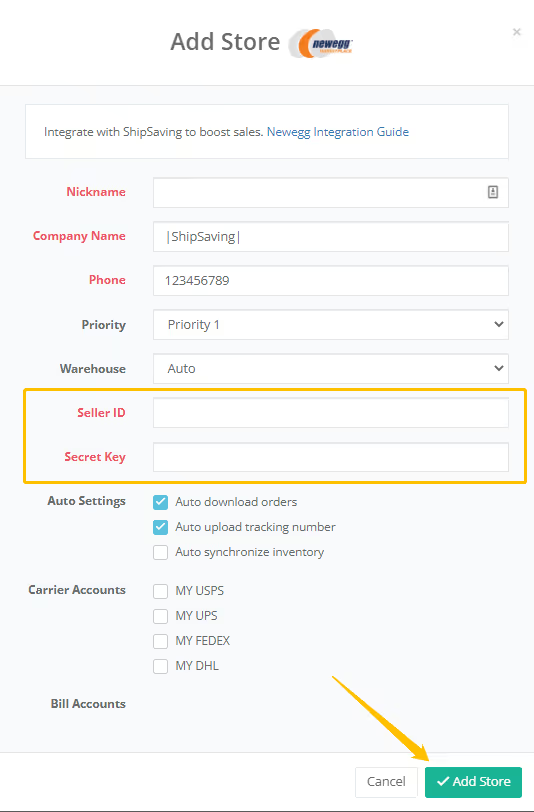
Login to ShipSaving. Go to Stores, and choose Newegg Marketplace.
Fill in all the required info, and paste your Seller ID & Secret Key, then click Add Store.
Congrats! It's done.
Login to ShipSaving. Go to Stores, and choose Yamibuy. Fill in your company name and phone number.
To get App Key and App Secret, call Yamibuy support team at 1-800-407-9710 or email help@yamibuy.com. Finish Auto Settings and setting up Carrier Accounts. Click Add Store

Congrats! It's done.
Go to Eccang login page, and copy the domain address.(https://ds.eccang.com/)
Login to ShipSaving. Go to Stores, and choose Eccang. Fill in the company name, phone number.
For EB Domain, according to Step 1, follow the template xx-eb.eccang.com (ex: ds-eb.eccang.com);
For WMS Domain, according to Step 1, follow the template xxx.eccang.com and delete http://, ex. ds.eccang.com;
And then, enter your Eccang user name and password.

For the rest part, check Auto download orders and Auto uploading tracking number. Select carrier accounts and click Add Store.

Congrats! It's done.
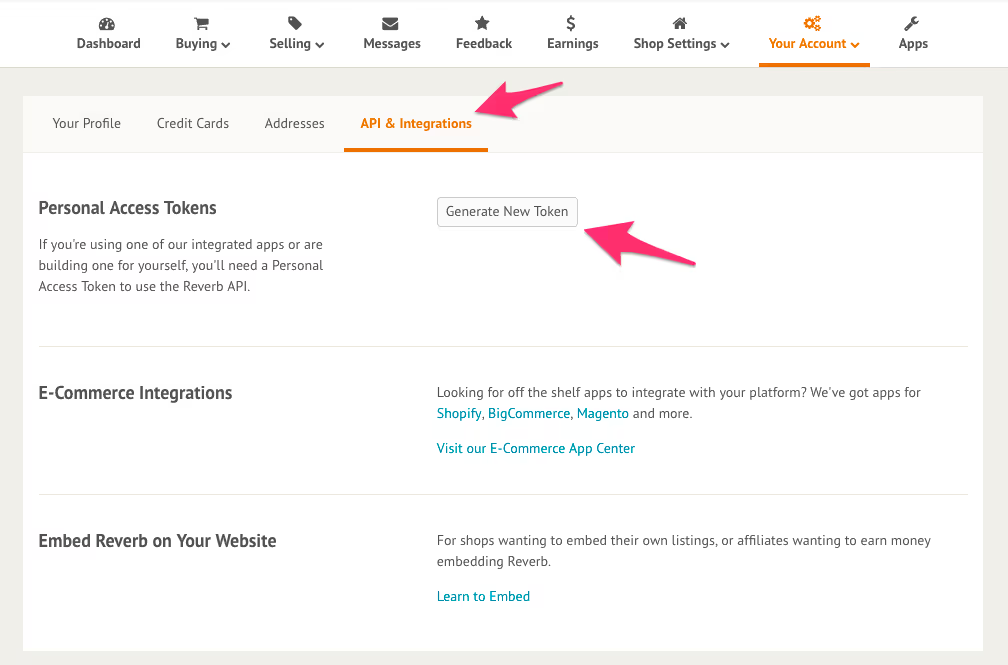
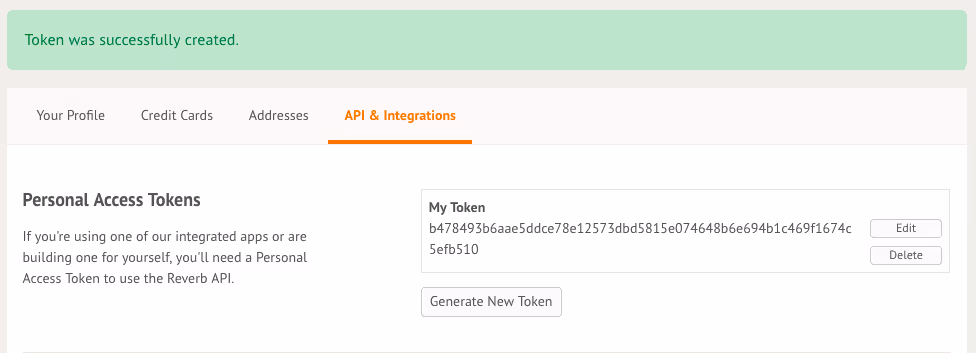
Log in to your Reverb store. Go to Menu -> My Profile

Click the API & Integrations Tab, then click the Generate New Token button.
Enter a name, then choose the scopes you need for your token. Scopes allow you to set the permissions of your token.
For most ecommerce integrations we recommend selecting the following scopes: public, read_listings, write_listings, read_orders, write_orders.

Your token is now created. Then copy it.
Login to ShipSaving. Go to Stores, and choose Reverb.
Fill in all the required info, and copy-paste your Token, then click Add Store.

Congrats! It's done.
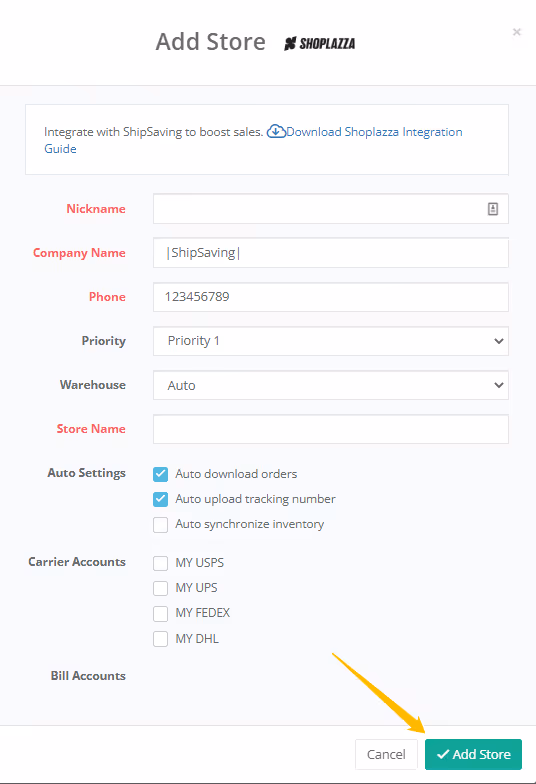
Login to ShipSaving. Go to Stores, and choose Shoplazza.
Fill in the store name and other required info, then click Add Store
You will be directed to the Shoplazza Authorize page. Click Authorize and use ShipSaving.

After successful authorization, it will jump directly back to ShipSaving.
Congrats! It's done.
Login to your Houzz seller account. Go to Settings>API tab; If it is not available, please email sellerapi@houzz.com and ask for API access for your account.
Select the following options: "Update product inventory" and "List and process orders", and then click Complete Registration.

Congrats! It's done.
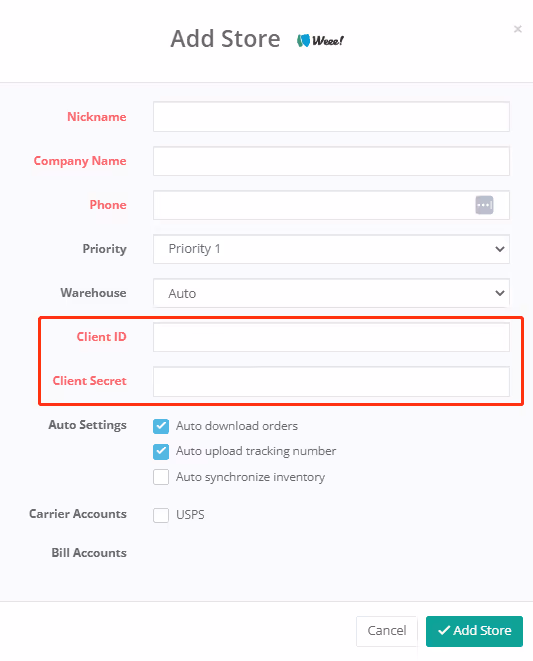
Please login to your account, and go to the Store page.
Click the Add Store button, and find Weee! Fill in your company name and phone number.
To get Client ID and Client Secret, call Weee! support team at 888-889-7098 or email support@sayweee.com. Or contact your BD directly.
Finish Auto Settings and setting up Carrier Accounts. Click Add Store
Congrats! It's done.
Please login to your Groupon - Account Settings, and check the Supplier ID. Go to Manager Access Tokens to create a Token.

Click the Add Store button, and find Groupon
Fill out the basic information, and enter your Supplier ID and Token.

Congrats! It's done.
How this works:
For eCommerce merchants, choosing a right shipping carrier is a critical decision. Read our guide to choose the best carriers for your shipping demands.
Ecommerce shipping strategy is about more than just free shipping and fast delivery. ShipSaving is going to share with you some insight.
Ecommerce is one of the fastest-growing aspects of today's retail landscape. We will discuss the step-by-step guide for growing your business.